Add plumbing
In this section, you'll learn about the different plumbing options supported by WDL and how you can implement plumbing in your own workflows.
What is plumbing?
By plumbing, we mean chaining tasks together to form sophisticated pipelines. So how do we do that in WDL?
With effortless grace, that's how.
Simple connections
At this point, you know how to include multiple tasks in your workflow script. If you were paying attention to the section about variables, you even know how to connect the output of one task to the input of the next. That enables you to build linear or simple branching and merging workflows of any length, with single or multiple inputs and outputs connected between tasks without any other code than what we've already covered.
Switching and iterating logic
In addition to those basic connection capabilities, you'll sometimes need to be able to switch between alternate pathways and iterate over sets of data, either in series or in parallel. For that, we're going to need some more code, but don't worry... you don't have to write any of it! Instead, we're going to take advantage of some handy features built into WDL syntax that make it easy to add this logic without a lot of effort.
One of the features of this type in WDL is scatter-gather parallelism, which is a great way to speed up execution when you need to apply the same command to subsets of data that can be treated as independent units.
You can also use conditionals in WDL, which allow you to choose under which conditions you want a block of code to be executed.
Efficiency through code re-use
Finally, you'll find you often need to do similar things in different contexts. Rather than copying the relevant code into several places -- which produces more code overall to maintain and update -- you can re-use the code smartly, either through task aliasing if your problem involves running the same tool in different ways, or by importing workflows wholesale.
With all these options for assembling calls to tasks into workflows, we can build some fairly sophisticated data processing and analysis pipelines. Admittedly this can seem a bit overwhelming at first, but don't worry -- we're here to help! Once you're done going through the WDL basics, we'll point you to a series of tutorials that show how to apply each option to some classic use cases that we encounter in genomics. But first, we'll show you how to check that the syntax of a workflow is valid.
You can read about different plumbing options below, or continue to the next section, Validate Syntax.
Plumbing options
WDL supports several different plumbing options and you can read more about them below.
Linear Chaining
The simplest way to chain tasks together in a workflow is a linear chain, where we feed the output of one task to the input of the next, like so:

This is easy to do because WDL allows us to refer to the output of any task (declared appropriately in the task's output block) within the call statement of another task (and indeed, anywhere else in the workflow block), using the syntax task_name.output_variable. So here, we simply specify in the call to stepB that we want it to use stepA.out as the value of the input variable in, and it's the same rule for stepC.
call stepB {
  input:
    in = stepA.out
}
call stepC {
  input:
    in = stepB.out
}
This relies on a principle called hierarchical naming that allows us to identify components by their parentage.
Multi-input / Multi-output
The ability to connect outputs to inputs described in Linear Chaining, which relies on hierarchical naming, allows you to chain together tools that produce multiple outputs and accept multiple inputs, and specify exactly which output feeds into which input.
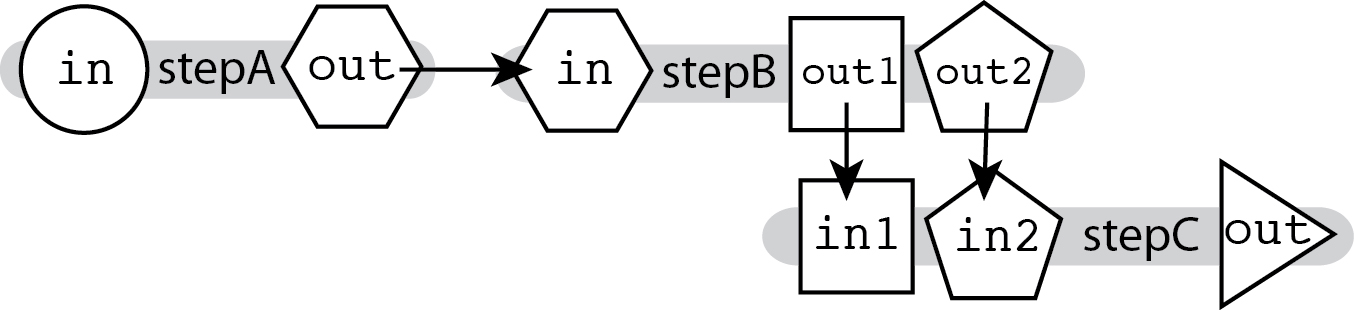
Since the outputs for stepB are named differently, we can specify which output maps to which input for stepC.
call stepC {
  input:
    in1 = stepB.out1,
    in2 = stepB.out2
}
Branch and Merge
The ability to connect outputs to inputs described in Linear Chaining and Multi-input/Multi-output, which relies on hierarchical naming, can be further extended to direct a task's outputs to separate paths, do something with them, then merge the branching paths back together.

Here you can see that the output of stepA feeds into both stepB and stepC to produce different outputs, which we then feed together into stepD.
call stepB {
  input:
    in = stepA.out
}
call stepC {
  input:
    in = stepA.out
}
call stepD {
  input:
    in1 = stepC.out,
    in2 = stepB.out
}
Conditionals (if/else)
Sometimes when pipelining, there are steps you won't want to run all the time. This could mean switching between two paths (run a tool in modeA vs. run a tool in modeB) or skipping a step entirely (run a tool vs. not running a tool). In cases such as these, we will use a conditional statement.

To use a conditional statement in WDL, you write a standard if statement:
if (shouldICallStepB) {
  call stepB {
    input:
      in = stepA.out
  }
}
The if statement can be controlled explicitly, as we have done in the above example by using a Boolean variable. It can also be controlled implicitly by testing the value of some other variable with its own purpose besides being a switch mechanism.
if (myVar>0) {
  call stepB
}
WDL doesn't support else statements in this context, but we can get around that by writing paired if statements using the ! modifier to get the opposite value of the original variable, like so:
if (!shouldICallStepB) {
  call stepC {
    input:
      in = stepA.out
  }
}
Scatter-Gather Parallelism
Parallelism is a way to make a program finish faster by performing several operations in parallel, rather than sequentially (i.e. waiting for each operation to finish before starting the next one). For a more detailed introduction on parallelism, you can read about it in-depth in the GATK article, Parallelism - Multithreading - Scatter Gather.
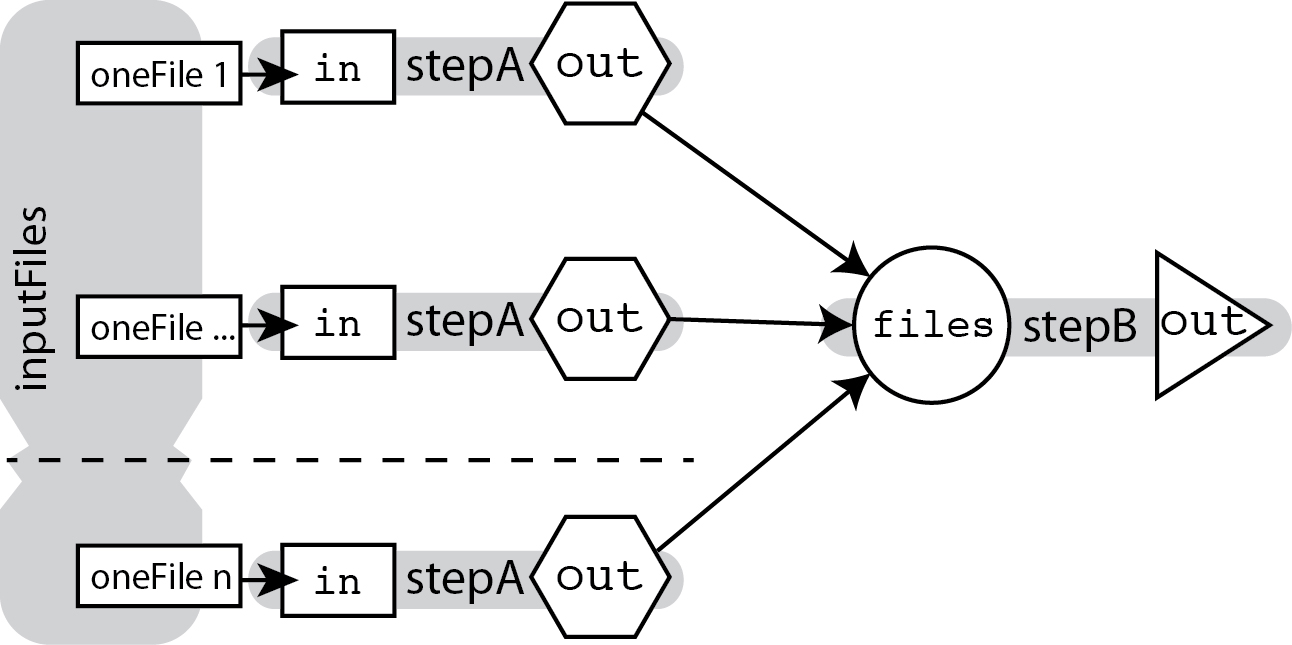
To do this, we use the scatter function from the WDL standard library, which will produce parallelizable jobs running the same task on each input in an array, and output the results as an array as well.
input {
  Array[File] inputFiles
}
scatter (oneFile in inputFiles) {
  call stepA {
    input:
      in = oneFile
}
call stepB {
  input:
    files = stepA.out
}
The magic here is that the array of outputs is produced and passed along to the next task without you ever making an explicit declaration about it being an array. Even though the output of stepA looks like a single file based on its declaration, just referring to stepA.out in any other call statement is sufficient for WDL to know that you mean the array grouping the outputs of all the parallelized stepA jobs.
In other words, the scatter part of the process is explicit while the gather part is implicit.
Task Aliasing
When you need to call a task more than once in a workflow, you can use task aliasing. It would be tedious to copy-paste a task's definition and change the name each time you needed to use it again in the workflow. This method, termed copy and paste programming, is simple enough up front but difficult to maintain in the long run. Imagine you found a typo in one of your tasks--you'd need to fix that typo in every single pasted task! However, using WDL's built-in task aliasing feature, you can call the same task code and assign it an alias. Then, following the principle of hierarchical naming, in order to access the output of an aliased task we use the alias, rather than the original task name.
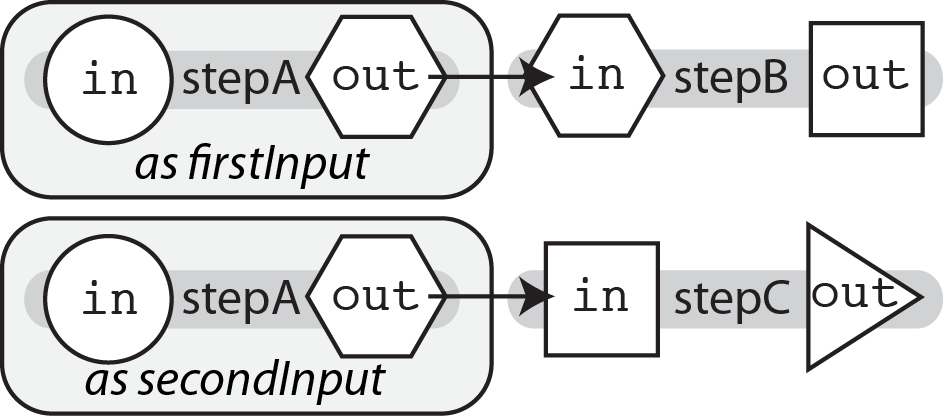
To use an alias, we use the syntax call taskName as aliasName.
call stepA as firstInput {
  input:
    in = in1
}
call stepA as secondInput {
  input:
    in = in2
}
call stepB {
  input:
    in = firstInput.out
}
call stepC {
  input:
    in = secondInput.out
}
Continue to the next section, Validate Syntax.